How to Build a WhatsApp AI Agent with LangChain and the Chatmaid API
LangChain + Chatmaid gives you a production WhatsApp AI agent in under 200 lines of Python. The agent handles multi-turn conversation naturally, has access to any tools you define, and runs 24/7 on a cheap server. The Supabase memory layer ensures conversation continuity across sessions. The Flask webhook handler processes incoming messages asynchronously to avoid timeouts. The tool pattern makes the agent extensible — add a new capability by writing a new @tool function. Get started: developers.chatmaid.net/signup
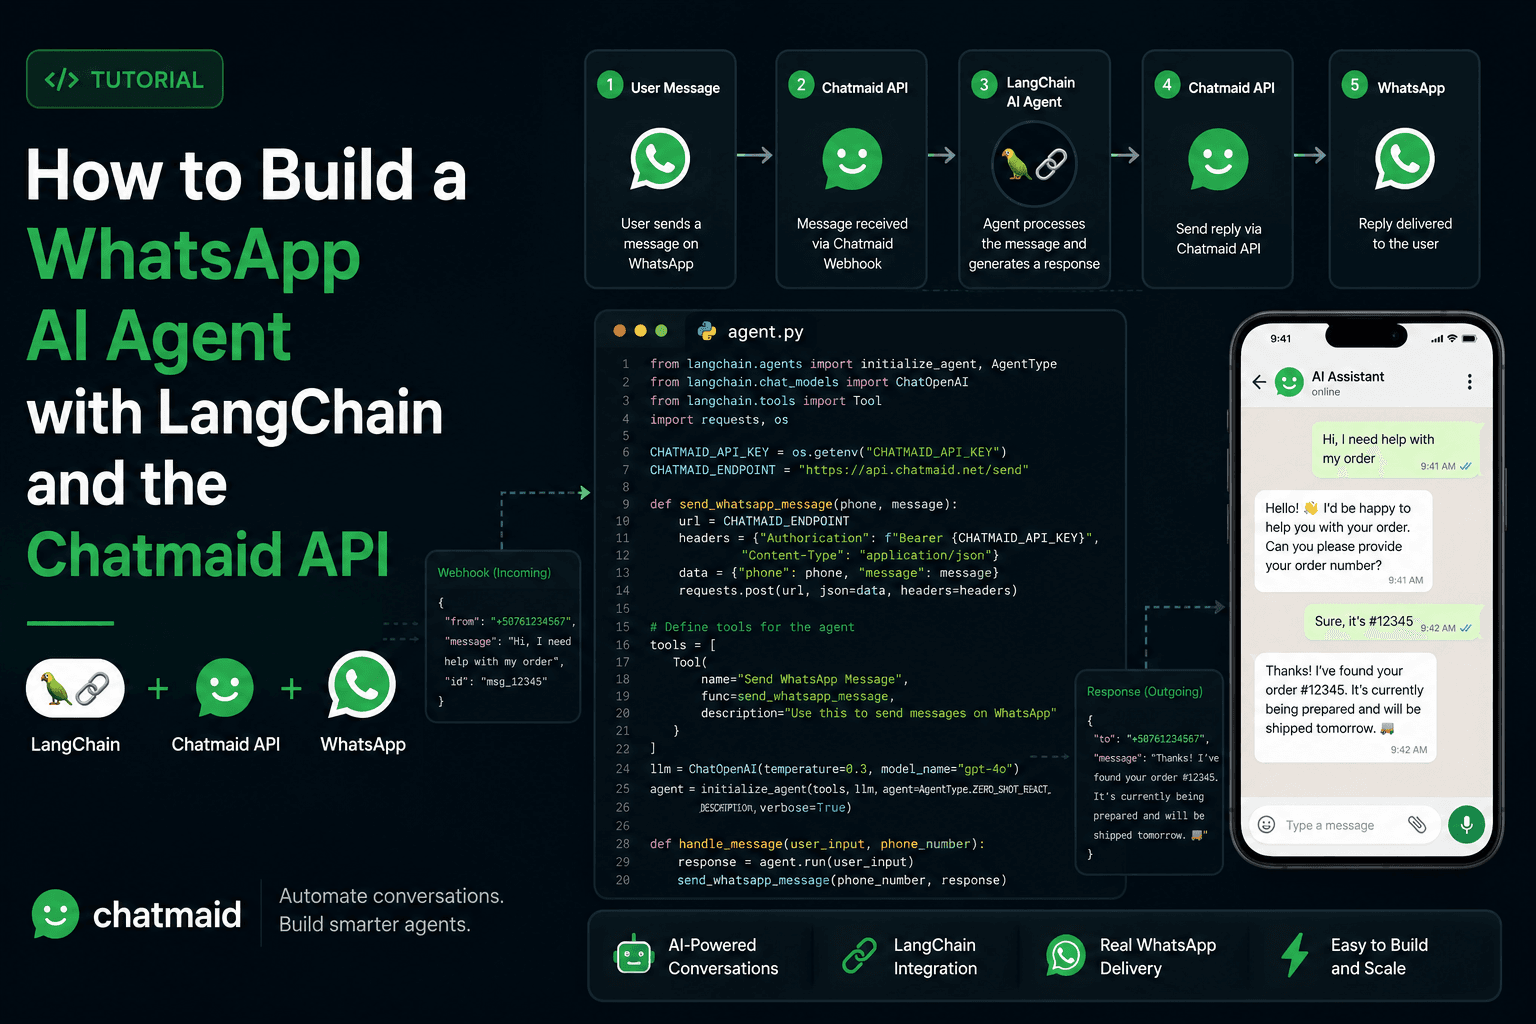
LangChain is the most widely used Python framework for building AI agents — giving your language model access to tools, memory, and multi-step reasoning. Combined with Chatmaid's WhatsApp API, you can give that agent a real WhatsApp number and turn it into a conversational interface that millions of people already know how to use.
This guide builds a complete WhatsApp AI agent with LangChain: multi-turn memory, tool use, and production webhook handling.
What You'll Build
A WhatsApp agent that:
- Maintains conversation memory across multiple messages
- Has access to tools (web search, database lookup, calculation, etc.)
- Handles incoming messages via Chatmaid webhook
- Replies over WhatsApp in real time
Prerequisites
bash
pip install langchain langchain-openai langchain-anthropic \ flask requests python-dotenv supabase
Environment variables:
bash
CHATMAID_API_KEY=sk_live_xxxxxxxxxxxx CHATMAID_WEBHOOK_SECRET=your_webhook_secret SENDER_PHONE=+15551234567 OPENAI_API_KEY=sk-xxxxxxxxxxxx # or ANTHROPIC_API_KEY SUPABASE_URL=https://xxx.supabase.co SUPABASE_KEY=your_supabase_anon_key
Part 1: The Chatmaid Send Tool
First, wrap the Chatmaid send API as a LangChain tool so the agent can use it to send messages:
python
import os import requests from langchain.tools import tool CHATMAID_API_KEY = os.environ["CHATMAID_API_KEY"] SENDER_PHONE = os.environ["SENDER_PHONE"] @tool def send_whatsapp_message(to: str, content: str) -> str: """Send a WhatsApp message to a phone number. Args: to: Phone number in international format (e.g., +15551234567) content: Message text to send Returns: Confirmation with message ID or error message """ response = requests.post( "https://developers-api.chatmaid.net/v1/messages/send", headers={ "Authorization": f"Bearer {CHATMAID_API_KEY}", "Content-Type": "application/json" }, json={ "fromPhoneId": SENDER_PHONE, "to": to, "content": content } ) if response.status_code in (200, 201): data = response.json() return f"Message sent successfully. ID: {data['messageId']}" else: return f"Failed to send: {response.json().get('error', {}).get('hint', 'Unknown error')}"
Part 2: Conversation Memory with Supabase
LangChain has several built-in memory classes. For a production WhatsApp agent, we need memory that:
- Persists between server restarts
- Is keyed by phone number (each customer has their own memory)
- Has a configurable window size
Here's a custom memory class using Supabase:
python
from langchain.memory import ConversationBufferWindowMemory from langchain.schema import HumanMessage, AIMessage from supabase import create_client from typing import List, Dict, Any class SupabaseWhatsAppMemory: """Persistent conversation memory keyed by WhatsApp phone number.""" def __init__(self, phone_number: str, window_size: int = 10): self.phone_number = phone_number self.window_size = window_size self.supabase = create_client( os.environ["SUPABASE_URL"], os.environ["SUPABASE_KEY"] ) def load_messages(self) -> List[Dict]: """Load the last N messages for this phone number.""" result = self.supabase.table("whatsapp_chat_history") \ .select("role, content") \ .eq("phone_number", self.phone_number) \ .order("created_at", desc=False) \ .limit(self.window_size * 2) \ .execute() return result.data or [] def save_message(self, role: str, content: str): """Save a single message turn.""" self.supabase.table("whatsapp_chat_history").insert({ "phone_number": self.phone_number, "role": role, "content": content }).execute() def get_langchain_messages(self): """Return messages formatted for LangChain.""" raw = self.load_messages() messages = [] for msg in raw: if msg["role"] == "user": messages.append(HumanMessage(content=msg["content"])) elif msg["role"] == "assistant": messages.append(AIMessage(content=msg["content"])) return messages
Part 3: Building the Agent
python
from langchain_openai import ChatOpenAI from langchain.agents import AgentExecutor, create_openai_tools_agent from langchain.prompts import ChatPromptTemplate, MessagesPlaceholder from langchain.tools import tool import datetime # Define tools available to the agent @tool def get_current_time() -> str: """Get the current date and time.""" return datetime.datetime.now().strftime("%B %d, %Y at %I:%M %p") @tool def calculate(expression: str) -> str: """Evaluate a mathematical expression. Args: expression: A math expression like '15 * 23 + 7' """ try: result = eval(expression, {"__builtins__": {}}) return str(result) except Exception as e: return f"Could not calculate: {str(e)}" # Add any other tools your agent needs: # - Database lookup # - Web search (via DuckDuckGo or Tavily) # - CRM query # - Calendar check TOOLS = [ get_current_time, calculate, # add_your_tools_here, ] SYSTEM_PROMPT = """You are a helpful AI assistant communicating via WhatsApp. Important guidelines: - Keep responses SHORT and conversational (2-4 sentences max) — this is WhatsApp - Respond in the same language the user writes in - Be warm and helpful - If you use a tool, naturally incorporate the result into your reply - If you don't know something, say so honestly - Don't use markdown formatting (no **bold**, no # headers) — WhatsApp renders plain text Current context: You're helping users who message this number with questions and requests.""" def create_whatsapp_agent(): """Create a LangChain agent for WhatsApp conversations.""" llm = ChatOpenAI(model="gpt-4o", temperature=0.3) prompt = ChatPromptTemplate.from_messages([ ("system", SYSTEM_PROMPT), MessagesPlaceholder(variable_name="chat_history"), ("human", "{input}"), MessagesPlaceholder(variable_name="agent_scratchpad"), ]) agent = create_openai_tools_agent(llm, TOOLS, prompt) return AgentExecutor( agent=agent, tools=TOOLS, verbose=True, max_iterations=3, handle_parsing_errors=True ) AGENT = create_whatsapp_agent()
Part 4: The Webhook Handler
python
from flask import Flask, request, jsonify import hmac import hashlib app = Flask(__name__) WEBHOOK_SECRET = os.environ["CHATMAID_WEBHOOK_SECRET"] def verify_signature(body: bytes, signature: str) -> bool: expected = "sha256=" + hmac.new( WEBHOOK_SECRET.encode(), body, hashlib.sha256 ).hexdigest() return hmac.compare_digest(signature, expected) @app.route("/webhook/whatsapp", methods=["POST"]) def whatsapp_webhook(): # Verify the request is from Chatmaid signature = request.headers.get("X-Chatmaid-Signature", "") if not verify_signature(request.get_data(), signature): return jsonify({"error": "Unauthorized"}), 401 # Acknowledge immediately (Chatmaid retries if no response within 5s) data = request.json # Process asynchronously to avoid timeout import threading thread = threading.Thread(target=process_message, args=(data,)) thread.daemon = True thread.start() return jsonify({"received": True}), 200 def process_message(payload: dict): """Process an incoming WhatsApp message.""" if payload.get("event") != "message.received": return msg_data = payload["data"] phone = msg_data["from"] user_message = msg_data["content"] # Skip if message is empty or non-text if not user_message or msg_data.get("type") != "text": return print(f"Message from {phone}: {user_message}") # Load conversation memory memory = SupabaseWhatsAppMemory(phone_number=phone, window_size=10) chat_history = memory.get_langchain_messages() # Save incoming message memory.save_message("user", user_message) try: # Run the agent result = AGENT.invoke({ "input": user_message, "chat_history": chat_history }) agent_reply = result["output"] # Save the agent's reply memory.save_message("assistant", agent_reply) # Send via Chatmaid send_whatsapp_direct(phone, agent_reply) except Exception as e: print(f"Agent error for {phone}: {e}") send_whatsapp_direct( phone, "Sorry, I had trouble processing your message. Please try again in a moment." ) def send_whatsapp_direct(to: str, content: str): """Send a WhatsApp message directly (not via the agent tool).""" requests.post( "https://developers-api.chatmaid.net/v1/messages/send", headers={ "Authorization": f"Bearer {CHATMAID_API_KEY}", "Content-Type": "application/json" }, json={ "fromPhoneId": SENDER_PHONE, "to": to, "content": content } ) if __name__ == "__main__": app.run(host="0.0.0.0", port=8000, debug=False)
Part 5: Adding Domain-Specific Tools
The agent becomes genuinely useful when you give it tools that access your data. Here are templates:
CRM Lookup Tool
python
@tool def lookup_customer(phone_number: str) -> str: """Look up customer information by phone number. Args: phone_number: Customer's WhatsApp number """ # Replace with your CRM query customer = db.query("SELECT * FROM customers WHERE phone = ?", phone_number) if not customer: return "No customer record found for this number." return ( f"Customer: {customer['name']}\n" f"Email: {customer['email']}\n" f"Plan: {customer['plan']}\n" f"Member since: {customer['created_at'][:10]}\n" f"Open tickets: {customer['open_tickets']}" )
Product Catalog Tool
python
@tool def search_products(query: str) -> str: """Search the product catalog. Args: query: Search terms (product name, category, price range) """ # Replace with your inventory system results = product_search(query, limit=3) if not results: return f"No products found matching '{query}'." formatted = [] for p in results: formatted.append(f"• {p['name']} — ${p['price']} ({p['status']})") return "\n".join(formatted)
Order Status Tool
python
@tool def get_order_status(order_number: str) -> str: """Get the status of a customer order. Args: order_number: Order number (with or without # prefix) """ order_number = order_number.lstrip('#') order = fetch_order(order_number) if not order: return f"Order #{order_number} not found." return ( f"Order #{order_number}\n" f"Status: {order['status']}\n" f"Items: {', '.join(order['items'])}\n" f"Tracking: {order.get('tracking', 'Not yet shipped')}" )
Part 6: Using Claude Instead of GPT-4o
To use Anthropic's Claude instead of OpenAI:
python
from langchain_anthropic import ChatAnthropic from langchain.agents import create_tool_calling_agent llm = ChatAnthropic(model="claude-sonnet-4-20250514", temperature=0.3) agent = create_tool_calling_agent(llm, TOOLS, prompt) executor = AgentExecutor(agent=agent, tools=TOOLS, verbose=True)
The rest of the code is identical — LangChain abstracts the provider difference.
Part 7: Deployment
For a production deployment:
dockerfile
FROM python:3.12-slim WORKDIR /app COPY requirements.txt . RUN pip install -r requirements.txt COPY . . CMD ["gunicorn", "--workers=4", "--bind=0.0.0.0:8000", "app:app"]
Deploy to Railway, Render, Fly.io, or any VPS. You need a public HTTPS URL for the Chatmaid webhook to reach your server.
For local development, use ngrok: ngrok http 8000 and register the ngrok URL as your Chatmaid webhook.